dotNet Falcon update

You might have noticed that in the last few months I haven't put out as many posts as I usually do. Well, here's a post explaining why (or rather, trying to make some excuses).
I am working on a couple of things (stay tuned for other awesome stuff coming your way). One of those things was the update of my blog engine and adding some cool new stuff to the blog.
Original setup
My original blog setup was quite simple. As you probably know, the blog engine itself is Ghost. I like Ghost for its simplicity, the ability to write posts in markdown and I think the amount of control over how the blog looks in general is just enough. Also, Ghost is cool.
The blog itself is hosted in Azure as an App Service. The reason for this are twofold: for one, Azure offers some nice PaaS features that I as a software engineer especially like. And Azure is cool and has cool features that I like to play with.
App Services are awesome and have a lot of cool features. One of those features is an option to add a hosted Git repository to your website that you can use to push your code and when you do, Azure automatically deploys your site. Back when I setup my blog, I did just this: forked (actually mirrored) the Ghost repo on Github, created an app service, then activated the local git repository and pushed the code to Azure. It took some time (I mean, with Node.js it always does), but I got it working.
I also had a storage account where I kept all the resources (images and stuff) that appeared on the blog. Ghost can store the images itself, but I thought that adding a simple link to the image that's kept elsewhere gives me more portability.
App Services also have a cool backup feature that creates scheduled backups of your site. For a site like my blog that keeps everything in an sqlite db this is very important.
Finally, I needed my Ghost theme. I looked through a couple, but ghostium was an instant winner. The simple, easy-to-look-through design inspired by Medium was (IMHO) a lot better the default theme, so I added that. Finally, all I needed was a cover image, and then I added Google Analytics and Disqus to the blog. And done :)
Upgrade
But since the initial setup, more than a year has passed. A lot of new releases of Ghost have come out with a lot of new features, especially in Ghost 1.0. I was longing for these new features, and my initial setup was not perfect either, so I decided to give it a try.
Upgrading Ghost
I found this great post by Chad Lee that shows how to setup Ghost on Azure. I decided to try it. Of course I wasn't just gonna hack my live site, so I used another great feature of App Services: deployment slots. A deployment slot is basically another App Service in the same App Service plan (so no additional costs) that you can use for scenarios like this: create the new version and then swap the two slots (which is really just a VIP swap). So again, I mirrored Chad's repository, cleaned it up a bit to suite my taste, and then set up the new deployment slot to pull the code from my Github automatically (because with App Services, you can do that too).
The transition wasn't entirely smooth (for some reason, the App Services use an ancient version of Node.js by default that's incompatible with the sqlite version that Ghost now uses), but after figuring out that I simply had to raise the Node.js version, I simply restore the packages again and everything was working fine (since than, Chad Lee updated the article with the required version). Since I still don't have an SSL certificate, I disabled the HTTPS rewrite rules and HSTS, and I was almost done.
I archived the backups of the old site (the backup service was still going, but I didn't want to accidentally restore an old backup), and I was basically done. Basically.
Upgrading the ghostium theme
Unfortunately, the theme that I chose is not maintained anymore. Fortunately, there are forks available on Github and the community kept the theme alive. So all it took was to find the right fork, and then apply the theme.
But I wasn't entirely content. The default Ghost theme has evolved a lot since it's first release: for example it has a very nice reading indicator with options to share the post on social media. So I just went ahead and copied it from the source to the ghostium theme. Now I have a nice reading indicator that you should by now see at the top of the screen.
Ghost also has the option to flag posts as featured. Ghost itself does not do anything with it, but you can use built-in features in the blog engine to display them yourself wherever you want. I felt that the sidebar was a little empty and a great place to show my featured posts. All I had to do was add a couple lines of code to the theme:
<li class="drawer-list-item drawer-list-title">
  Featured
</li>
{{#get "posts" filter="featured:true" limit="6" as |featured|}}
  <section class="featured-posts">
    {{#foreach featured}}
      <li class="drawer-list-item"><a href="{{url}}">{{title}}</a></li>
    {{/foreach}}
  </section>
{{/get}}
But the sidebar still felt a little empty. So I decided I should add the tags that I use for the posts so that you can easily find posts that belong to a specific topic. Again, with just a few lines of code:
<li class="drawer-list-divider"></li>
<li class="drawer-list-item drawer-list-title">
  Tags
</li>
{{#get "tags"}}
  <div class="drawer-tagcontainer">
	{{#foreach tags}}
	  <a class="drawer-tag" href={{url}}>{{name}}</a>
    {{/foreach}}
  </div>
{{/get}}
And that's that. Now I have a cool new blog engine with a cool new design (actually old, but you get the point).
Import-export
Ghost has a cool feature that allows you to export your blog (posts, users, tags etc.) into a json file and then you can import the json file back. Basically a backup solution built-in. I simply exported the old blog instance and imported the json into the new instance.
And then it dawned on my: if this process could be automated, I could use this as a backup as well. There's nothing wrong with the Azure backup, but it backs up everything. You can of course leave out files, but at the end of the day, you export files that are used by the current version. And if there are breaking changes in Ghost or in the sqlite versions that Ghost uses, the files might not work. But the json is just a json. Even if there are breaking changes, I think I have a better chance of reusing the json export backup across versions.
Unfortunately, the public (beta) API of Ghost doesn't allow you to access the export feature programmatically. But since everything is just an HTTP request, you can use Fiddler or whatever to look at the authentication process and the export process and then [implement the requests yourself]. And I did just that. Finally, I just needed a scheduled way to run the thing and a place where I could put the backups. For storage, Azure storage was an obvious choice. To run the backup code, I chose Azure Functions. A nice piece of serverless solution that allows you to run your code without having to setup unnecessary things like a web server or anything like that. Ohh, and since I added the Azrue Function to the same App Service plan where my blog is, again, there are no extra costs. You can check out the backup function at Github (note that you have to setup a couple of App Settings for this to work; look at the Init method to see which ones, I guess they are pretty self-explanatory).
App insights
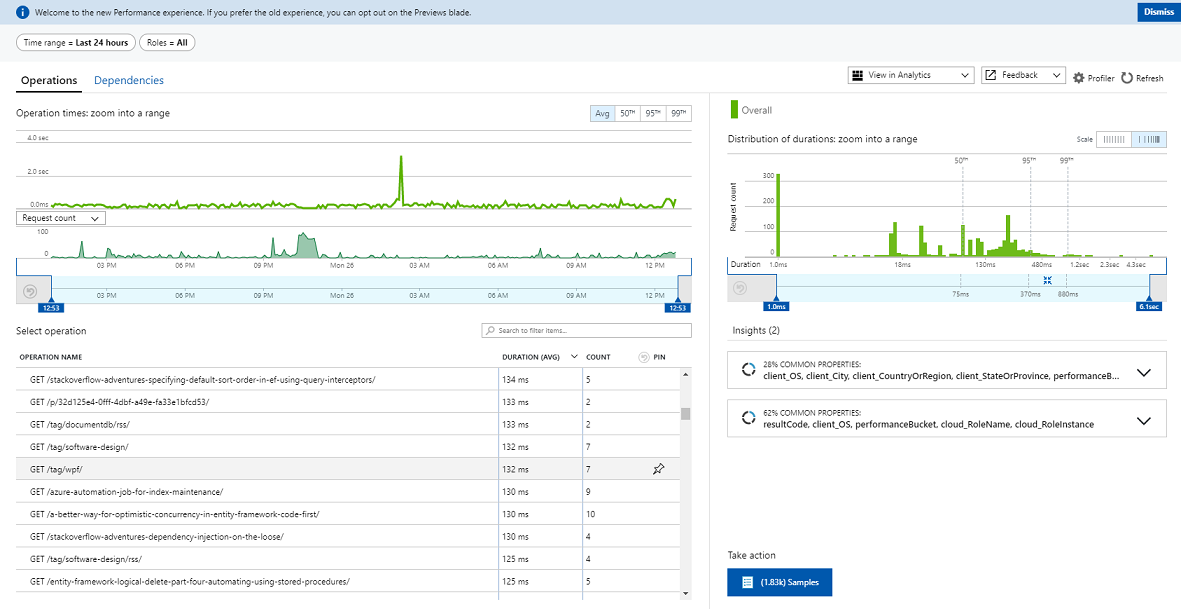
Since I was already in Azure, it occurred to me that there is a cool feature that I still wasn't using: Application Insights. I did have Google Analytics, but that's more for client side metrics. Application Insights can do that to, but where it really shines is server side analytics. Unfortunately it wasn't straightforward for me where should I put the 4 lines of code that needed to be added to App Insights. I tried everything, but everything gave a cryptic error (sometimes mishandled promise failures, sometimes ACL errors). I even asked a question about it on SO, but no one could help. So I went back to Chad Lee and asked him — and he had the best and simplest solution: just add it to the root index.js, at the top. I didn't even think about that; I was looking for the usual convoluted javascript-solution. But guess what: it worked. All I had to do was add a couple of lines of code:
And using the code injection feature of Ghost, inject a couple lines of js into the header:
And now I have server-side metrics:
Extending the blog with into my business
For a while now I've been working as an independent consultant and instructor. And like every independent business man worth their salt, I too needed a website where potential clients can look me up and contact me. I didn't have that, so I had to create one. Now I'm really not a frontend guy, so I just went to themeforest and bought a template that I liked, modified it a bit and then created a new App Service where I could upload it. Again, the App Service uses Github as the deployment source, and again, the App Service runs in the same App Service plan, so there are no extra costs.
The only thing that I didn't like about the original template is that it used PHP for email sending. Whenever I see PHP my first instinct is to rewrite the whole thing with whatever (I mean, PHP? come on). So I needed my own email sending solution.
Of course, I didn't create my own email sending solution: the whole point of PaaS features is to help you not have to spend hours configuring servers. So I simply created a Sendgrid subscription and guess what? Azure Functions have very simple and strong integration with Sendgrid. Again with just a couple of line of code, I created a function that can be called from any website with an ajax request and then it sends the email using Sendgrid:
public static class EmailSender
{
  [FunctionName("SendEmail")]
  public static void Run(
            [HttpTrigger(AuthorizationLevel.Anonymous, "get", "post", Route = null)]ContactInfo contactInfo,
            [SendGrid] out SendGridMessage message)
  {
    message = new SendGridMessage();
    message.AddTo("my valid email address here");
    message.AddContent("text/html", contactInfo.Message);
    message.SetFrom(new EmailAddress(contactInfo.Email));
    message.SetSubject("Question from promo from " + contactInfo.Name);
  }
}
And again, I deployed the function into the same App Service plan, so there were no extra costs.
Wrapping up
So that's it, the shiny new version of my blog. Using the features provided by Azure App Services (continuous delivery, deployment slots backup, deploying more into the same App Service Plan) I could upgrade relatively painlessly and also keep the costs low. Azure Functions are also absolutely amazing: they make it very easy to write and run code that would require a lot of infrastructure. And of course last but not least, App Insights helps me keep my blog up and running and diagnose any issues efficiently.
What's next
For now, I think I'm done :) But I can imagine a new page where I access, aggregate and display analytics data from Google Analytics and App Insights and display it in pretty graphs :)
Also, Ghost can be extended with custom storage modules that implement storage of resources, like the images that you upload to the posts. Now I upload the images manually to Azure, but I could implement a custom storage module that saves into Azure implicitly. Actually there are implementations available for Azure, but I do have a problem with those: they save the images into a single container and add the current year and month to the image path. I like to be a little more explicit and use the post name, but I'm not yet sure how I could do this, or if this is even possible. I asked a question about this on Stackoverflow, but no one has answered it yet. If you have any idea feel free to join (start) the discussion.
And most importantly, I'll be publishing awesome content that you hopefully like using this new, shiny infrastructure :)